Zero-Downtime PostgreSQL Upgrade with Logical Replication and Application-Level Switching

A few months ago, I helped my company upgrade our production PostgreSQL database from version 14 to 17.
For context, our product is a physical security and cloud-based access control platform. We produce and sell physical security hardware (readers, controllers, electronic locks, access cards, etc.) and provide a cloud platform that facilitates the management of these devices and access to the spaces they secure.
The cloud platform consists of many services, with a Ruby on Rails backend and a PostgreSQL database at its core. The Rails application handles account management, access control, door authorization, door unlocking, and hardware configuration. Its API serves all internal clients and thousands of integrators.
Database unavailability has cascading consequences: it means the Rails application becomes unavailable, which means millions of users cannot open their doors. The repercussions for our customers and the company are severe. That's how critical this database is.
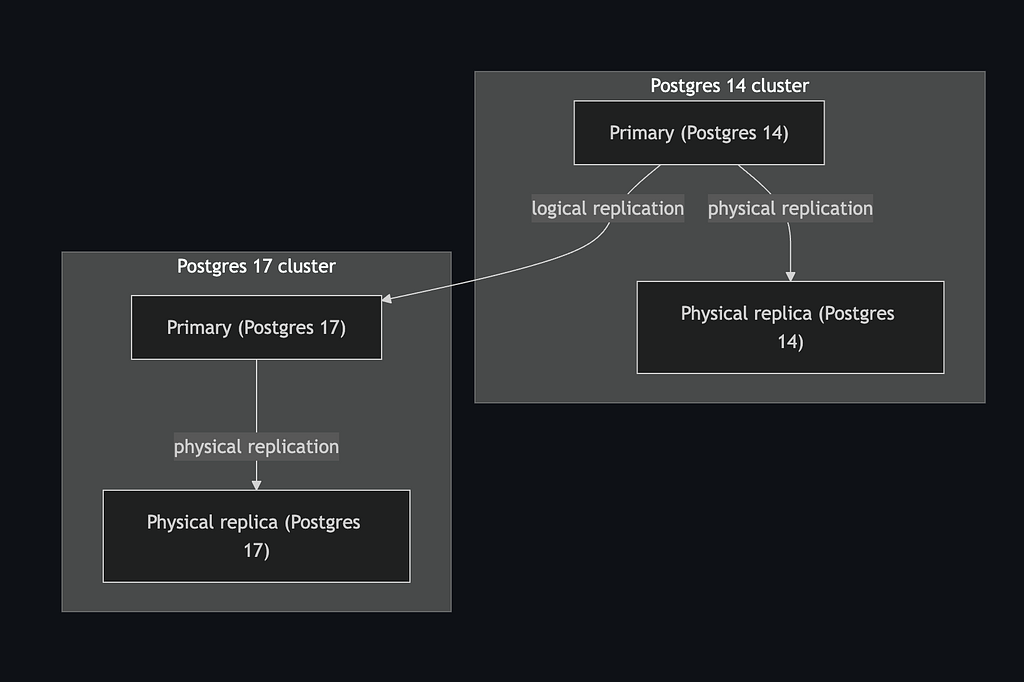
The PostgreSQL database is a GCP Cloud SQL service consisting of a master instance and a read replica. The Rails application uses the master, while the Data team uses the replica for customer-facing analytical features and our Business Intelligence team uses it for revenue insights and business analysis. We needed to upgrade both instances from version 14 to 17 with minimal downtime.
We considered and tested two approaches:
In-place upgrade
This is executed using the pg_upgrade tool, which ships with every Postgres version. It is straightforward. The entire upgrade can be executed with a single command on Cloud SQL. However, it has several drawbacks:
- Downtime: Since system catalogs and internal structures of relations are updated to be compatible with the new version, the database is made unavailable until the upgrade process is complete. The amount of downtime is proportional to the size of the database. We tested an in-place upgrade with a clone of our production database, and we observed about 20 minutes of downtime.
- Zero data loss rollback is infeasible: Before executing the in-place upgrade, Cloud SQL first does a pre-upgrade backup. So after the upgrade, it is possible to roll back to the previous version by doing a recovery with the pre-upgrade backup. This means any changes on the upgraded version will be lost after rolling back.
Given that 20 minutes of downtime was unacceptable for the business, we ruled out this approach.
Logical Replication-based blue-green upgrade
This involves creating a fresh database instance on the target version with adequate hardware resources and server configurations, copying data from the source to the target, replicating changes as they happen with logical replication, and switching traffic to the target at some point.
For clarity, I’ll refer to the existing database as the source and the new database as the target.
Brief explanation of Logical replication
Logical replication is based on logical decoding, which is a very powerful PostgreSQL feature.
PostgreSQL uses a Write-Ahead Log (WAL) to ensure durability, recoverability, and write efficiency. When a transaction commits, WAL records, which represent the operations that were executed during the transaction and the changes effected by those operations, are appended to the log.
Logical replication is essentially a pub/sub model that decodes WAL records into logical changes in a specific data format (e.g., JSON) and streams them to subscribers, which could be other databases or any application that runs a logical decoding client, e.g., pg_recvlogical. The logical changes are then reapplied to the subscriber database or used for other purposes like change data capture (CDC) for non-database subscribers. Since only logical changes are replicated, it is possible to replicate changes across major Postgres versions.
A logical replication-based blue-green upgrade has its pros and cons.
PROS
- Zero or minimal downtime is possible regardless of database size.
- Zero data loss rollback is possible.
- Can opportunistically scale up or scale down hardware resources by simply creating the target database with the desired hardware configuration. This is particularly significant for managed services like Cloud SQL, which don't offer an option to scale down storage size. You could also opportunistically change server configurations, which normally requires a database restart to take effect.
- Existing database bloat is automatically eliminated since the target is a new database.
CONS
- More complicated.
- Time-consuming. Custom upgrade tooling is necessary, which is prone to bugs and mistakes like any software. Exhaustive testing of the tool and the entire upgrade process is necessary. All these require considerable time, effort, and resources.
- Since the hosts change, a switch from the source to the target is required. This requires careful coordination. Switching is more complicated for more complex database setups, e.g., sharded databases and databases with many replicas used by external parties.
Executing The Logical Replication-based blue-green upgrade
We executed the upgrade in 3 main steps:
- Preparing the target database clusters.
- Preparing for traffic switch from source to target clusters.
- Switching traffic.
Preparing The Target Database Clusters
This involved creating clusters in the target version with all the necessary configurations and setting up logical replication from the source to the target. We did these in the following steps, mostly facilitated by custom scripts we created:
1. Create the target primary instance in version 17 with the necessary configurations.
We use Terraform for managing our infrastructure configurations. This simplified the creation of the target database instance on Cloud SQL. All we needed to do was copy the source's Terraform configuration, update the database version to 17, update the server configurations we wanted to change, and apply the Terraform configuration.
2. Create the target database
CREATE DATABASE target_db;
3. Copy the source's database schema to the target
pg_dump -s source_db_url | psql target_db_url
4. Set up logical replication from source’s primary to the target’s primary
This involves creating a publication on the source and a subscription on the target.
Replace target_db_url and source_db_url with Postgres connection strings for the source and target.
On the source:
CREATE PUBLICATION upgrade_pub FOR ALL TABLES;
On the target:
CREATE SUBSCRIPTION upgrade_sub
CONNECTION source_db_url
PUBLICATION upgrade_pub;
This will do an initial copy of the source table data to the target using the SQL COPY command and then replicate subsequent changes.
Setting up logical replication has 2 prerequisites:
- Logical replication must be enabled on the source. This is enabled with the
wal_levelconfiguration set tologicalor with thecloudsql.logical_decodingflag on Cloud SQL. - The source’s user for the replication connection must have the
REPLICATIONattribute and at leastSELECTprivilege on all tables in the source.
5. Wait for the target to be in sync with the source.
The pg_subscription_rel view can be used to track the replication progress. Also, you could do a simple table count comparison between the source and target to verify they’re in sync.
6. Copy table storage parameters from source to target, e.g. autovacuum-related configurations, etc.
The following query can be used to retrieve them:
SELECT relname, reloptions FROM information_schema.tables
INNER JOIN pg_class ON pg_class.relname = tables.table_name
WHERE table_schema = 'public'
AND table_type = 'BASE TABLE'
AND reloptions IS NOT NULL;
7. Update statistics on the target by running:
ANALYZE
8. Create a physical read replica of the target
Setting this up is straightforward, directly from the Cloud SQL UI or with Terraform.
9. Verify that the source’s primary is in sync with the target’s read replica.
Simple row counts suffice for this.
Notes:
Schema changes aren't replicated with logical replication. So new database migrations should be suspended until the upgrade process is complete.
A purely logical replication approach can be challenging for large or complex databases. For instance, in very large datasets (tens or hundreds of terabytes), the initial copy phase of logical replication can take too long and may even fail.
In such cases, a hybrid approach combining physical replication, LSN recovery, and logical replication is often used to set up the target. However, managed services like Cloud SQL impose several restrictions that make this method impractical, e.g. limited configuration options (such as the inability to set recovery_target_lsn) and no direct access to WAL files.
Given our database size and setup, a pure logical replication approach was sufficient; the initial copy completed in about one hour.
Preparing For Traffic Switch
Given these high stakes, the traffic switch needed to be instant and smooth. To prevent conflicts and data corruption, writes must never occur simultaneously to both databases. This mutual exclusivity was our primary constraint during the switch.
We took an unconventional approach by handling the switch at the application level instead of performing the more typical proxy-based switch with PgBouncer. Since our existing setup didn't include PgBouncer, introducing it solely for the upgrade would add operational complexity and an additional failure point.
We first coordinated with other teams to switch their applications from the old read replica to the new one. This was straightforward since they used the replica via a big query connection. We only had to change the connection's data source to the new replica.
Switching the replica first also provided a useful side benefit: it allowed us to validate the upgraded database in a live environment before the full cutover.
Now to the more interesting part: the Rails application––our most critical service. We leveraged Rails' multi-database support for the application-level switch.
The idea is simple: Establish connection pools to both the target and source databases, and set up a middleware that selects which connection to use for each HTTP request or background job based on a feature flag.
To set up connections to both databases in our Rails applications and dynamic database selection, we did the following:
1. Define configurations for both databases in the config/database.yml file:
production:
  source:
    <<: *postgresql
    url: <%= ENV['DATABASE_URL'] %>
  target:
    <<: *postgresql
    url: <%= ENV['TARGET_DATABASE_URL'] %>
    database_tasks: false
2. Tell ActiveRecord to create connection pools to both databases at boot time with the following piece of code in app/models/application_record.rb.
class ApplicationRecord < ActiveRecord::Base
	self.abstract_class = true

	connects_to(
		shards: {
			source: { writing: :source, reading: :source },
			target: { writing: :target, reading: :target }
		}
	)
end
3. Set up a database selector middleware for the web server and other services.
For the web server middleware, Rails provides a generator:
bin/rails g activerecord:multidb
This will generate a config/initializers/multidb.rb file. Only the shard_resolver configuration is relevant to us. shard_resolver takes a block that returns the database name. The database name must match any of the configured databases (in our case source or target):
Rails.application.configure do
	config.active_record.shard_resolver = lambda do |_request|
		DatabaseSelector.selected_database # returns 'source' or 'target'
	end
end
For other services like Sidekiq, manual selection is required. A Sidekiq server middleware should suffice:
config/initializers/sidekiq.rb:
Sidekiq.configure_server do |config|
	config.server_middleware do |chain|
		# The database selector should be the first middleware in
		# the chain (before any code that hits the database runs).
		chain.add lambda do |_job_instance, _job_payload, _queue, &block|
			ActiveRecord::Base.connected_to(shard: DatabaseSelector.selected_database) do
				ActiveRecord::Base.prohibit_shard_swapping(&block)
			end
		end
	end
end
If you use other services, a similar setup is applicable. The key principle is that all code that call the database should be wrapped in an ActiveRecord::Base.connected_to block.
Our database selector was based on a simple Redis key. Any storage service other than the database being upgraded would work. We chose Redis for it's speed. We didn't want the database selection to be a bottleneck for HTTP requests and background jobs.
lib/database_selector.rb:
class DatabaseSelector
	def self.selected_database
		# redis error handling is hidden here for brevity.
		# Ensure your connection code has that
		redis_connection.get("selected_database") || "source"
	end
end
Switching Traffic
Pre-switch
1. Advance the target sequences
Our primary keys use sequential integers generated by PostgreSQL sequences. Since logical replication doesn't replicate sequence state, sequences on the target database start from 1. If we switch to the target without addressing this, the insertions on the target would attempt to use primary key values like 1, 2, 3: values that already exist in the replicated data, causing constraint violations. To prevent this, we query the current sequence values from the source and advance the target sequences accordingly just before switching.
Simple Ruby script to do this:
require("pg")

source_connection = PG.connect(source_db_url)
target_connection = PG.connect(target_db_url)

# Retrieve current sequence state from the source
source_sequences = source_connection.exec(<<~SQL).values.to_h
 SELECT sequencename, last_value FROM pg_sequences;
SQL

# Retrieve the current estimated table sizes.
# You may use statistical sizes as below if autovacuum/autoanalyze run frequently
# to update statistics. Else use real table counts.
table_sizes = target_connection.exec(<<~SQL).values.to_h
 SELECT relname, n_live_tup FROM pg_stat_user_tables;
SQL

# Advance the target sequences based on the source.
source_sequences.each do |name, value|
	table_size = table_sizes[name.rpartition("_id_seq").first]
	next unless table_size

  # Advance by 10% the table size, but at least 1000 to account for unlikely but
  # possible spike in insertions for small tables.
  advance_by = [(table_size * 0.1).to_i, 1000].max
  sequence_value = value.to_i + advance_by
  target_connection.exec("SELECT setval('#{name}', #{sequence_value});")
end
The Switch
The actual switch involved several steps.
1. Make the source database read-only for the user the application connects with.
def make_source_read_only
	source_connection.exec(<<~SQL)
		ALTER ROLE db_user
		SET default_transaction_read_only = on;
	SQL
end
Important: The source_connection's user executing the above command must be a different user from the one your application connects with (i.e the one being made read-only).
2. Refresh all client connections to the source database for the previous step to take effect.
Since ActiveRecord uses a recoverable connection pool, terminating the connections from the database server was sufficient:
def refresh_source_connections
	source_connection.exec(<<~SQL)
		SELECT pg_terminate_backend(pid) FROM pg_stat_activity
		WHERE datname = 'your_database_name'
		AND backend_type = 'client backend'
		AND pid <> pg_backend_pid();
	end
end
This will force a refresh of all ActiveRecord connections, making them read-only. Writes to the source database will fail from this point.
3. Wait for all pending changes to be replicated on the target (this took less than a second for us).
We tracked this by capturing the pg_current_wal_flush_lsn() value on the source and then comparing it with the latest_end_lsn value in the pg_stat_subscription view on the target. If the latest_end_lsn is greater than or equal to the source's reference lsn, then all changes have been replicated.
def wait_for_replication_completion
	cutover_lsn = source_connection.exec(<<~SQL).getvalue(0,0)
		SELECT pg_current_wal_flush_lsn();
	SQL
	sleep(0.1) until all_changes_applied_on_target?(cutover_lsn)
	puts("All pending changes applied on the target")
end

def all_changes_applied_on_target?(cutover_lsn)
	all_applied = target_connection.exec(<<~SQL).getvalue(0,0)
		SELECT latest_end_lsn >= '#{cutover_lsn}'::pg_lsn AS all_applied
		FROM pg_stat_subscription
		WHERE subname = 'upgrade_sub';
	SQL
	all_applied == "t"
end
4. Prepare for logical replication inversion
To enable a rollback to the old database without data loss in case there are issues with the new one, we invert replication by stopping the source -> target replication and creating a target -> source replication. This will keep the source in sync with the target after the switch.
So we prepare by dropping the subscription on the target, creating a publication and a replication slot:
def destroy_subscription_on_target
	target_connection.exec(<<~SQL)
		DROP SUBSCRIPTION upgrade_sub;
		CREATE PUBLICATION rollback_pub FOR ALL TABLES;
		SELECT * FROM pg_create_logical_replication_slot('rollback_slot', 'pgoutput');
	SQL
end
5. Switch the application traffic to the target
Switch the selected_database value in Redis (or whatever external storage service you chose) to target:
def switch_traffic_to_target
	redis_connection.set("selected_database", "target")
end
The rails application will switch to the target connection, thanks to the middleware we setup previously.
6. Finalize the logical replication inversion
We do this by creating a subscription on the source with the replication slot we created in step 4:
def create_subscription_on_source
	source_connection.exec(<<~SQL)
		CREATE SUBSCRIPTION rollback_sub
		CONNECTION target_db_url
		PUBLICATION rollback_pub
		WITH(copy_data=false, create_slot=false, slot_name='rollback_slot');
	SQL
end
Note: The subscription must be created with copy_data=false. This is required to skip the logical replication data copy phase which happens by default. Specifying the replication slot (slot_name) ensures data is replicated from the point the slot was created. This ensures that the source is synced with the target after the switch since the slot was created when there were no writes to either databases.
All steps were executed in one go with a script that invoked the methods described in the steps sequentially:
# Database switching script
make_source_read_only
refresh_source_connections
wait_for_replication_completion
destroy_subscription_on_target
switch_traffic_to_target
create_subscription_on_source
The switch completed in less than 10 seconds with approximately 5 seconds of write downtime (from making the source read-only until traffic was switched to the target).
There were a few failed requests during that time. But generally, it was a successful upgrade.
Rollback Path
Having a rollback path without data loss was a key advantage of this approach. We had a 3-day rollback window with comprehensive monitoring for query performance and database health, ready to roll back if critical issues emerged.
Fortunately, the upgraded database functioned as intended and we didn't need to roll back. The rollback procedure would have been straightforward thanks to the inverted replication (target → source) we established during the switch. The rollback steps mirror the forward switch:
- Re-enable writes on the source
- Advance sequences on the target (similar to the source advancement during the forward switch)
- Make the target read-only
- Terminate target connections
- Wait for replication to complete (target → source)
- Switch the Redis key back to "source"
Conclusion
We spent weeks testing the entire upgrade flow in a staging environment. This included validating data consistency, measuring replication lag under load, and rehearsing the cutover procedure multiple times. This preparation was essential to our success.
The upgrade was successful with about 5 seconds of write downtime and zero read downtime. This is a dramatic improvement over the 20+ minutes required for an in-place upgrade. The reusable scripts and procedures we developed will significantly simplify future major version upgrades.
This logical replication approach is well-suited for production databases where downtime is costly and a rollback path is essential. While more complex than an in-place upgrade, the benefits (minimal downtime and zero data loss rollback capability) make it worthwhile for critical systems. For smaller databases or systems that can tolerate extended downtime, an in-place upgrade remains a simpler option.
Thanks for reading! Have thoughts or questions?
More articles